Adding your works to your ORCID record helps ensure visibility, discoverability, and accurate attribution of your research. Here are the main ways to add works:
1. Add works using Search & Link Wizard to pull in works from other databases (e.g. Crossref, DataCite)
2. Add works using an identifier such as DOI (Digital Object Identifier)
3. Import and export works via BibTeX
4. Add works manually - for older works or content not indexed in a database
You can also set up auto updates by providing your iD and granting permissions to trusted organizations so that they can add data to your ORCID record automatically.
You can grant permission to one or more trusted individuals to update your ORCID record, acting as a delegate or proxy. Note: They must be ORCID iD holders as well.
To do so, sign in to ORCID, click the down arrow beside your name, go to 'Trusted individuals'. In the search box, enter the ORCID iD, email address, or name of the person you want to make a trusted individual. Search and add.
Once the 'trusted individual' has been added, he/she will see an additional option upon log in. Under his/her name in ORCID, he/she will see the heading 'Switch account'. Clicking on 'Switch account' will list the records that he/she can manage.
To add works from Crossref, you must first grant access to the organization using Search & Link.
The advantage of using Search & Link is that you are getting data about the work directly from the source, and this allows the addition of contributor information, which is not possible via other methods.
To add datasets from DataCite, you must first grant access to the organization using Search & Link.
The advantage of using Search & Link is that you are getting data about the work directly from the source, and this allows the addition of contributor information, which is not possible via other methods.
Refer to the same video, 'How to import works into your ORCID record using a Search & Link wizard' from ORCID. Follow the steps for Search & Link, and select DataCite from the list of databases.
Related FAQ:
You will need to login to Web of Science Researcher Profile to grant permission to allow the linking of your Web of Science Researcher Profile with your ORCID. Please follow these steps:
1. Click on Edit next to your profile in the menu, or from your profile directly.
2. Navigate to ORCID sync.
3. Click 'Connect my ORCID'.

Granting Web of Science permission to update your ORCID record or works
Once your ORCID profile is linked, you can select ‘Grant Web of Science researcher profile permission to update your ORCID works’ and confirm the authorization request. Please then click on "Export publications to ORCID now" or "Export peer reviews to ORCID now” found under the “Manually sync ORCID with Web of Science” header in your settings page.

You may now also turn on the automatic sync options:
Related FAQs:
How do I add works from Web of Science Researcher Profile to ORCID?
How do I update works in my Web of Science Researcher Profile using my ORCID record?
To do so, you can use this link to add publication data from your Scopus Author Profile to your ORCID record.
Note: If you see a message from your browser that tells you that the site is not secure, look for "Details" and select "Go on to the webpage".
Screen capture of the landing page:

Related FAQ:
How do I add publication data from my Scopus Author Profile to my ORCID record?
Can I update my Scopus Author Profile using the publication data from my ORCID record?
It is possible to export your citations from Google Scholar and import them into your ORCID record.
Related FAQs:
How do I update my ORCID record using the publication data from my Google Scholar Profile?
Can I update my Google Scholar Profile using the publication data from my ORCID record?
It is recommended to add works directly from databases, e.g. Crossref. However, if you have works that cannot be found, you can manually add them into your ORCID record.
The different types of works that can be added include: book, book chapter, book review, journal article, magazine article, newspaper article, supervised student publication, working paper, conference output, conference paper, conference poster, patent, lecture, etc. Conference abstract may be keyed in as conference output as recommended in Legacy Work types. See the details here.
There are also work types that support a range of arts and humanities contributions.
When adding works manually, start from the Works header, click +Add, then Add manually.

A box will then appear so that you can fill in the work type and other metadata for the work.

Select a work type by choosing from the drop-down options.
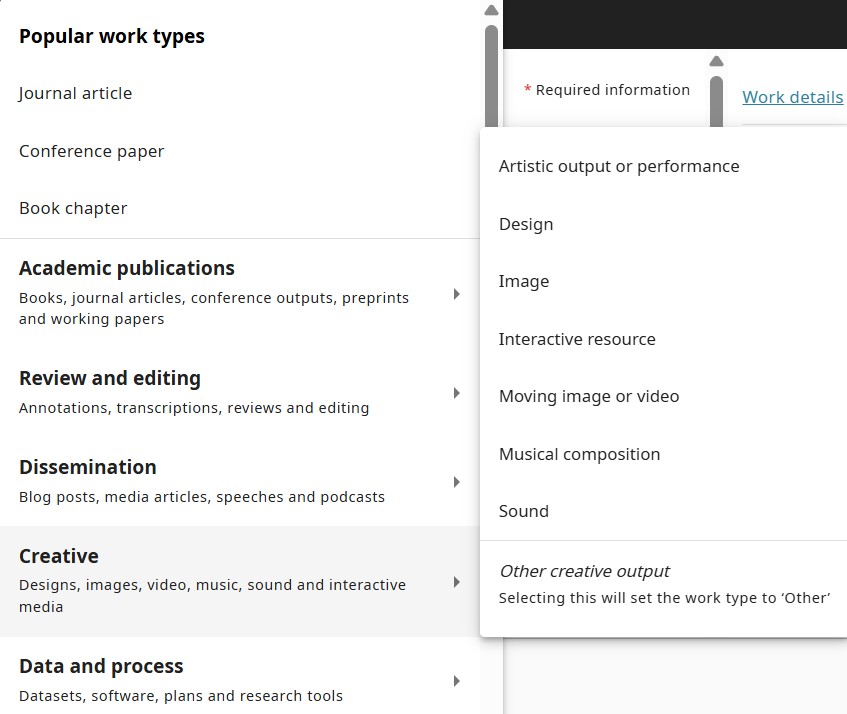
You will then be able to view your selection in the work type field.

Add in the Work identifier such as DOI or ISBN if available. When you enter an identifier, the system will check the identifier's source to see whether it is valid. If it is not valid, you will receive an error message. You can still save a work even if an error message is displayed.

Click Save changes after you have keyed in all the metadata.

'Trusted organizations' are those to which you have granted permission to interact with your ORCID iD and record.
Granting permissions to 'trusted organisations' to update your ORCID record ensures easy and error-free sharing and re-use of information:
It is recommended that NTU members permit selected trusted organisations such as Crossref and DataCite to add/update their record.
You can revoke the permission anytime from the Trusted organizations section of your account settings page and click delete (the trash can icon) near the name of the organization whose access you want to revoke.
Begin by signing in to your ORCID record. Add the following personal information: